This article is for people who haven't had an iPhone before and want to activate their new iPhone. It also assumes that you're using iOS 5 or higher (which is what runs on the iPhone 4S, and some late 2011 iPhone 4 and 3GS models)
Begin by turning on your iPhone by holding down the sleep/power button in the top right corner. When the screen lights up, you'll see the image above. Swipe the slider to the right to begin iPhone activation.
Set Language and Location
The first step in activating your iPhone is to set the location where you'll be using it. That
involves selecting the language you want the phone to work in (what language will be shown onscreen) and set your home country. Begin by tapping on the language you want to use and then tap the Next button in the top right corner of the screen. With that done, tap on the country you want to use the phone in (this won't prevent you from using it elsewhere, but it determines what your home country is) and tap the Next button.
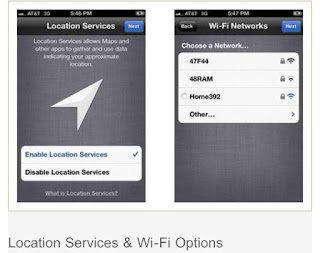
The next thing you need to decide when activating your iPhone is whether you want to turn on Location Services or not. Location Services are the iPhone'sGPS features, the features that allow you to get driving directions, find movies and restaurants nearby, and other things that depend on knowing your location.
Some people may not want to turn this on, but I recommend it. Not having it on will remove a lot of useful functionality from your iPhone. Tap on your choice and then tap Next in the top right corner to proceed.

The next option is to connect to a Wi-Fi network, if you have one. This isn't required, but if you have a Wi-Fi network where you're activating your iPhone, tap on it and then enter its password (if it has one). Your iPhone will remember the password from now and you'll be able to connect to the network any time you're in range. Tap the Next button to proceed.
iPhone Set up

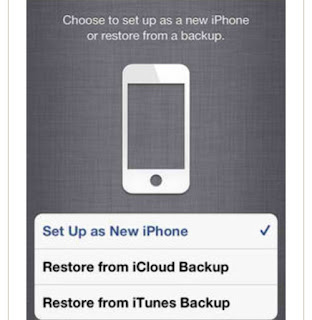
Set Up As New iPhone - This is your choice if you haven't had an iPhone, iPad, or iPod before. This means you're starting completely from scratch.
Restore from iCloud Backup - If you haven't had an iOS device before this doesn't apply to you. However, if you've used iCloud to backup your data, apps, and other content from other devices, choose this to download the data from your iCloud account to your iPhone.
Restore from iTunes Backup - Again, this won't work if you haven't had an iPhone, iPod, or iPad before. If you have, though, you can install your apps, music, settings, and other data on your new iPhone from the backups that already exist on your PC. This isn't required--you can always set up as new if you want--but it's an option that makes the transition to a new device smooth.
Create or Enter Your Apple ID
Once that's done, you'll be asked to either enter an existing Apple ID or create a new one. YourApple ID is an account that you'll use for a lot of things, from buying at iTunes to using iCloud to making Genius Bar support appointments, and more. If you have an existing Apple ID that you've used with a previous Apple product or to buy an iTunes, log in with it here. If not, you'll need to create one.
Tap the button to create a new Apple ID and follow the onscreen prompts. You'll need to enter information like your birthday, name, and email address to create your account.
Enable iCloud
You'll see a screen or two of terms and conditions. You're required to agree to them in order to use your iPhone, so go ahead and agree. Once you've done that, you'll have a pair of options related to iCloud, a free web-based service Apple offers to its customers that allows you to do many things. Generally speaking, I recommend using iCloud since it allows you to do the following:
Use Find My iPhone
- Redownload Purchases from iTunes
- Use PhotoStream to store and access photos online
- Store and access Pages, Keynote, and Numbers documents online
- Backup your iPhone data and restore from backup over the Internet
- Use your iCloud as a central account for your calendar, contact, and email and sync them to all iCloud-compatible devices
- Use iTunes Match
Your iCloud account will be added to the Apple ID that you entered or created in the last step.
To enable iCloud, slide the button to On, or leave it off and tap Next.
Next, decide where you want to backup your iPhone. If you choose iCloud, your data will be backed up to iCloud each day via Wi-Fi. This has a number of advantages--your data isn't on your computer, so a hard drive crash can't lose it; you can restore over the Internet (as seen in step 3)--but you may prefer to backup your iPhone to your computer each time you sync.
Tap on the option you want and then tap the Next button to continue.
Enable Siri
This step applies only to the iPhone 4S and newer models.
Here, you need to decide whether you want to enable Siri, the iPhone's voice-activated assistant that you can talk to to perform actions. Siri is one of the most exciting features of the iPhone 4S. I recommend enabling it, but it's not required. Make your choice and tap the Next button to head to the final few steps.
Find My iPhone and Complete Activation
First, you have to decide whether you want to enable Find My iPhone. I recommend that all iPhone users do this. It allows you touse the phone's built-in GPS to locate a lost or stolen iPhone so you can recover it. If you ever lose your iPhone, you'll be glad you have it.
Tap to make your choice and then tap Next to continue.
Apple will then ask if you want to share information about your iPhone--basically information about how the iPhone is working and whether it crashes, etc.; no personal information is shared--with them. It helps improve the overall experience of using the iPhone, but is strictly optional.
Once you've done that, you're ready to go!
Since you didn't set up your iPhone using data from iCloud or a backup, you'll need to add content to your iPhone from your PC
Sent from my iPhone


0 comments:
Post a Comment